12 mins read
How to Add a CDN to Your WordPress Site for Max Speed
Share Article :


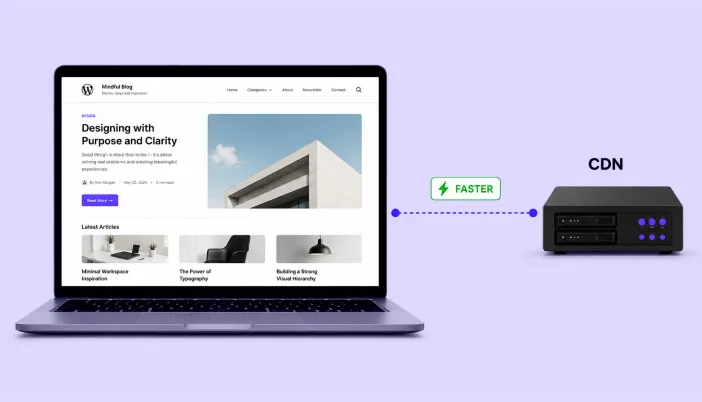
In this guide, you’ll learn what a CDN actually does, when your WordPress website needs one, how to add a CDN to WordPress, how to configure it correctly, what files should be delivered through it, how CDN caching works, how to avoid common mistakes, and how to check whether the CDN is actually making your website faster.
We’ll also look at how a CDN works alongside WordPress caching, image optimization and other performance techniques, so you don’t end up treating a CDN as a magic button.
What is a CDN?
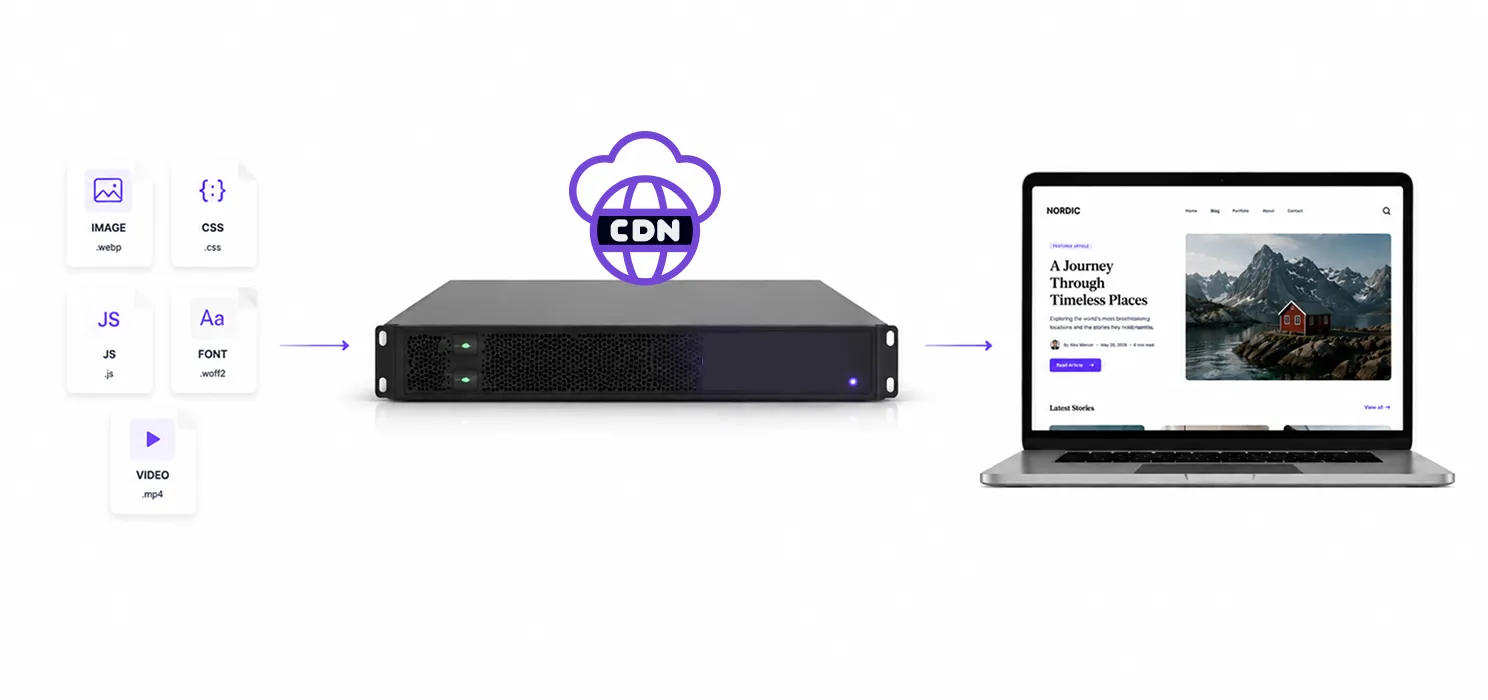
CDN stands for Content Delivery Network.
It is a network of servers distributed across different geographic locations that helps deliver your website’s content closer to your visitors.
The CDN can serve resources such as:
- Images
- CSS
- JavaScript
- Fonts
- Videos
- Downloads
- Other static files
Depending on the CDN and configuration, it can also cache HTML pages and reduce requests reaching your WordPress server. That’s where things become especially interesting for WordPress websites.
Why does a CDN make WordPress faster?
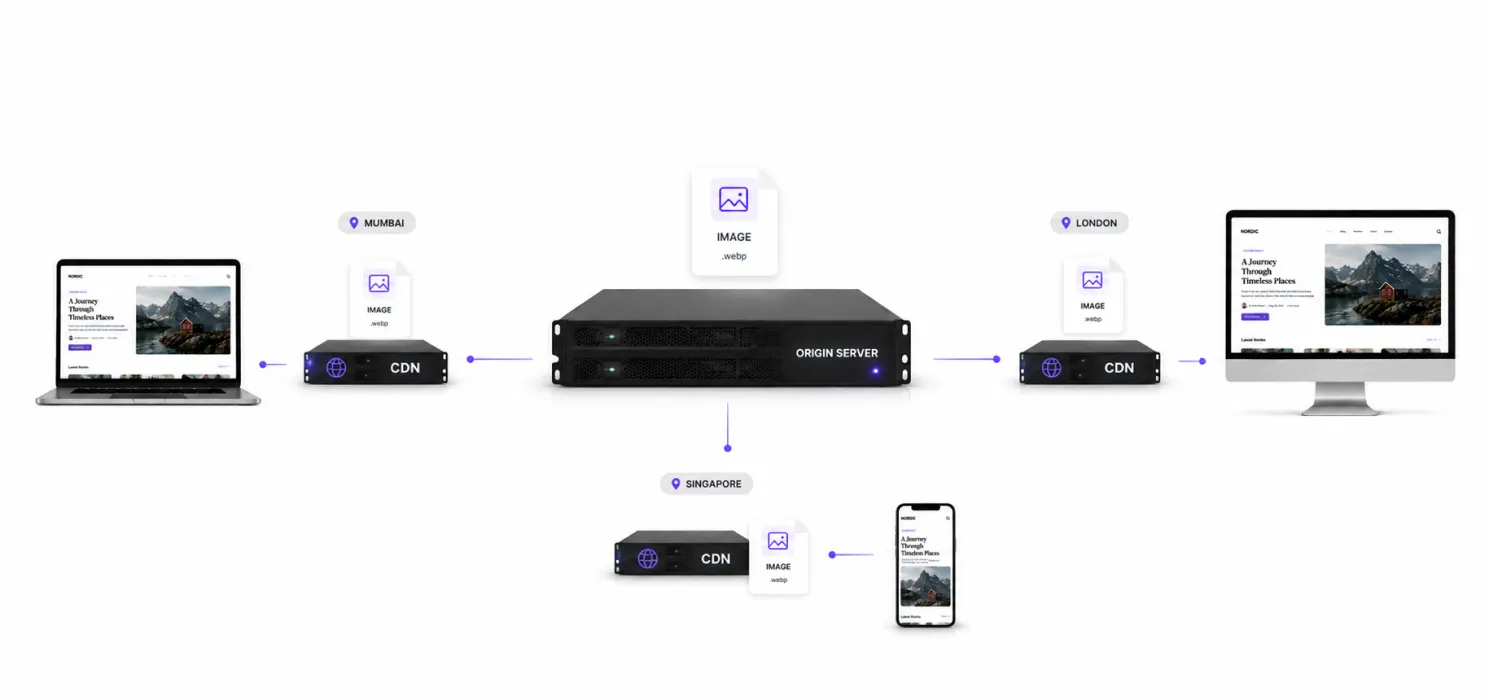
Let’s say your WordPress server is located in Mumbai. A visitor opens your website from London. Without a CDN, many resources may need to travel from your origin server to London.
Now imagine another visitor arrives from Singapore. Again, your origin server may have to deliver those resources. Then another visitor arrives from New York. Again.
The physical distance between the visitor and your server can affect network latency. A CDN places copies of frequently requested content across its network. So the visitor may receive the resource from a location much closer to them.
Does every WordPress website need a CDN?
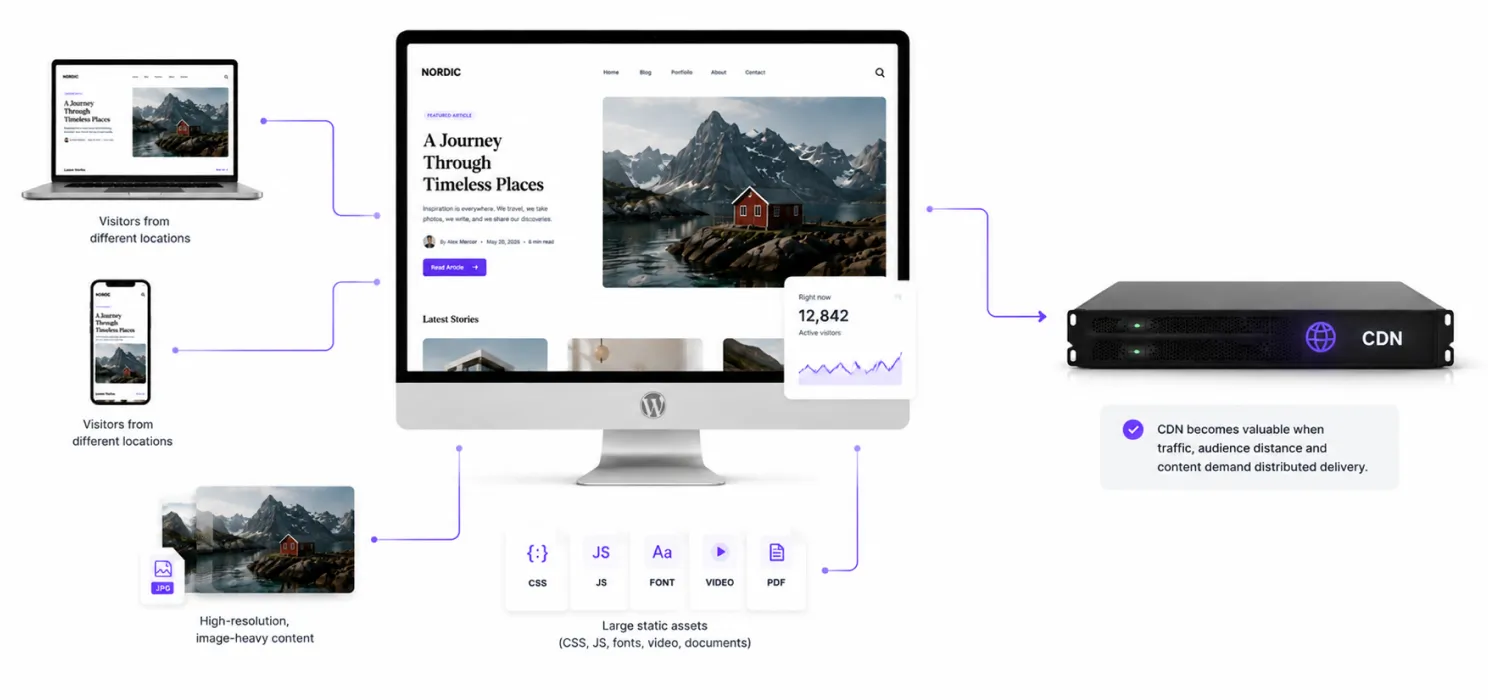
Not necessarily. If your website serves mostly local visitors and your hosting is already close to them, a CDN may not produce a dramatic improvement in every situation.
But a CDN becomes much more useful when:
- Your visitors are spread across countries
- Your website has lots of images
- Your website has large static assets
- You receive significant traffic
- Your origin server is under load
- You publish media-heavy content
- Your website serves visitors far from your hosting location
A portfolio with high-resolution images can benefit.
A blog with thousands of visitors from different countries can benefit.
An online store serving an international audience can benefit.
A local business with almost all customers in the same city may see less dramatic gains.
The point isn’t: “Every website needs a CDN.”
The point is: Use a CDN when your traffic and content make distributed delivery useful.
CDN vs WordPress hosting: what’s the difference?
This confuses many website owners. Your hosting provider stores and runs your WordPress website. The CDN primarily helps deliver your content efficiently to visitors.
Think of it like this:
Hosting
Runs WordPress
Runs PHP
Runs database
Stores website
Processes requests
CDN
Delivers cached content
Serves static assets
Reduces origin-server requests
Moves content closer to visitorsThey aren’t replacements for each other. A fast CDN cannot completely fix terrible hosting. And excellent hosting doesn’t eliminate the potential benefits of a CDN. The strongest setup often uses both.
Before adding a CDN, understand your origin server
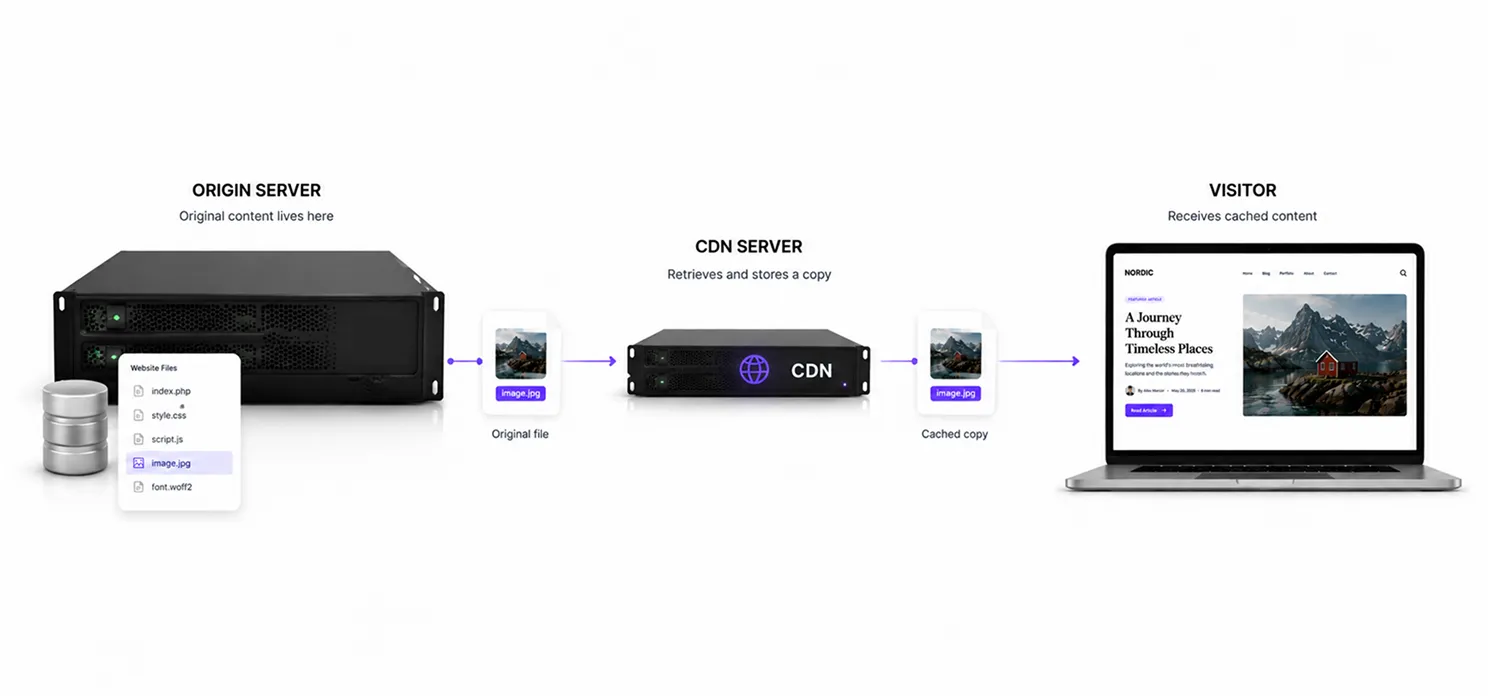
Your WordPress hosting is called your origin. That’s where the original version of your content lives.
When the CDN doesn’t already have a requested file, it can retrieve that file from your origin. It may then cache it and serve future requests from the edge. This is why CDN configuration needs to be done carefully. If your origin server is misconfigured, the CDN doesn’t magically fix everything.
What should you put behind a CDN?
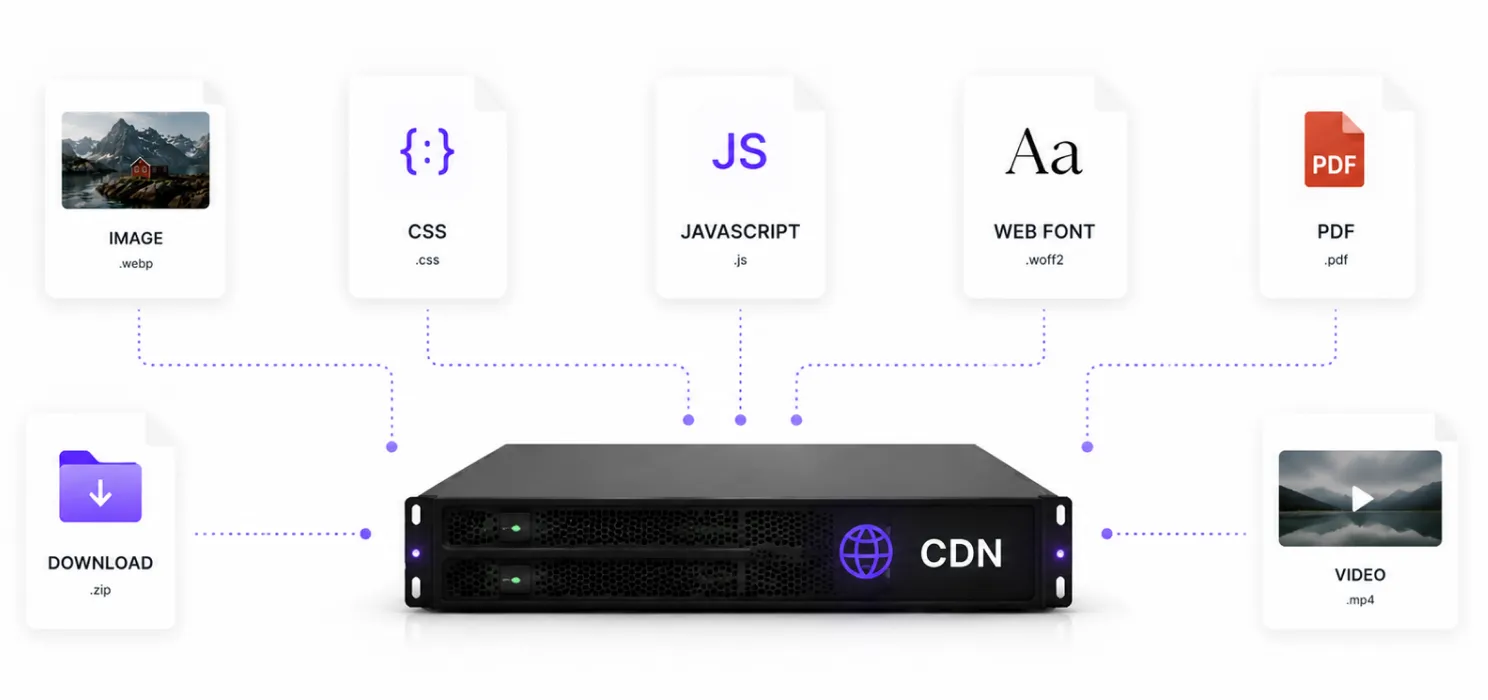
For most WordPress websites, static assets are the easiest place to start.
Good CDN candidates
- Images
- CSS
- JavaScript
- Web fonts
- PDFs
- Downloads
- Videos
- Other static media
These files don’t normally change for every visitor. That makes them much easier to cache and deliver through a CDN.
What about HTML pages?
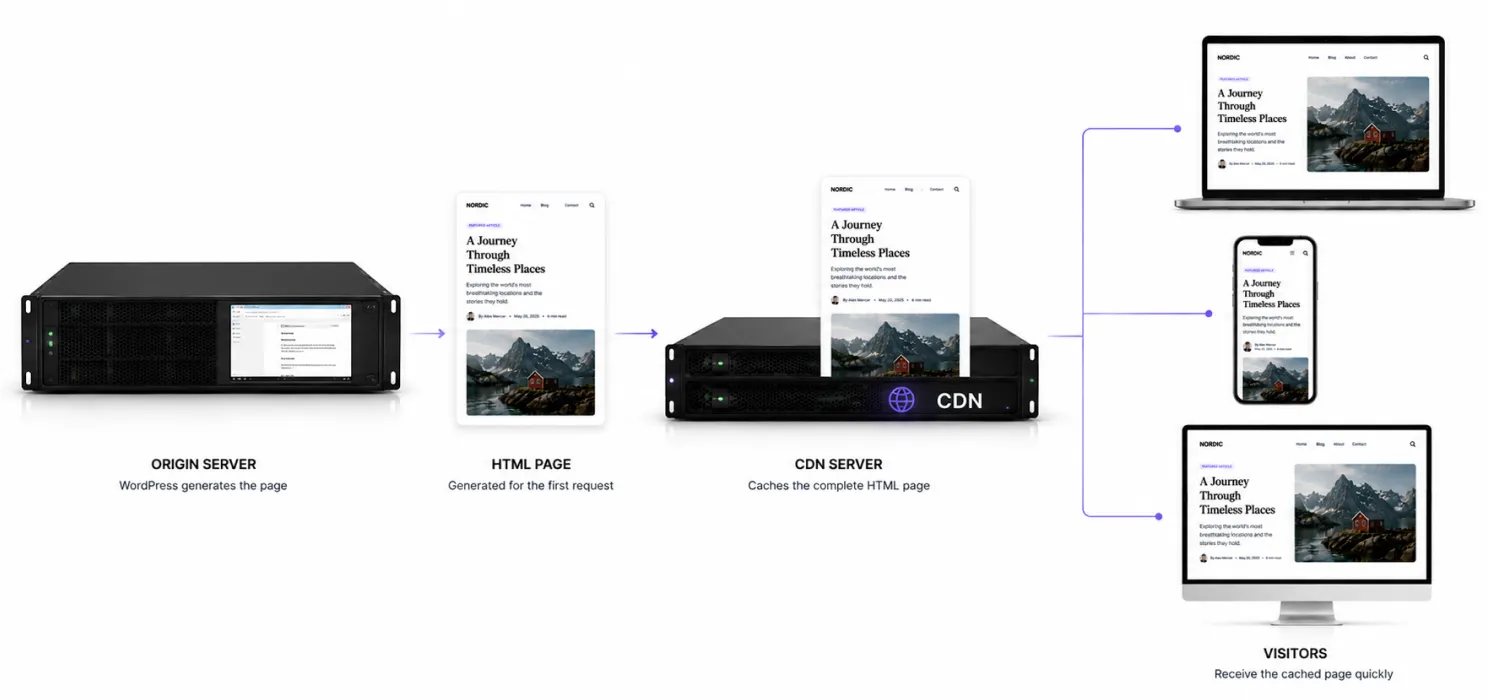
This is where things become more interesting. A CDN can sometimes cache complete HTML pages as well. For a blog, this can be extremely useful. Imagine 10,000 people visit the same article.
Now WordPress doesn’t necessarily have to rebuild the same page repeatedly. That can dramatically reduce origin-server workload. But HTML caching needs more careful configuration than static assets because some pages are dynamic.
Step 1: Choose your CDN
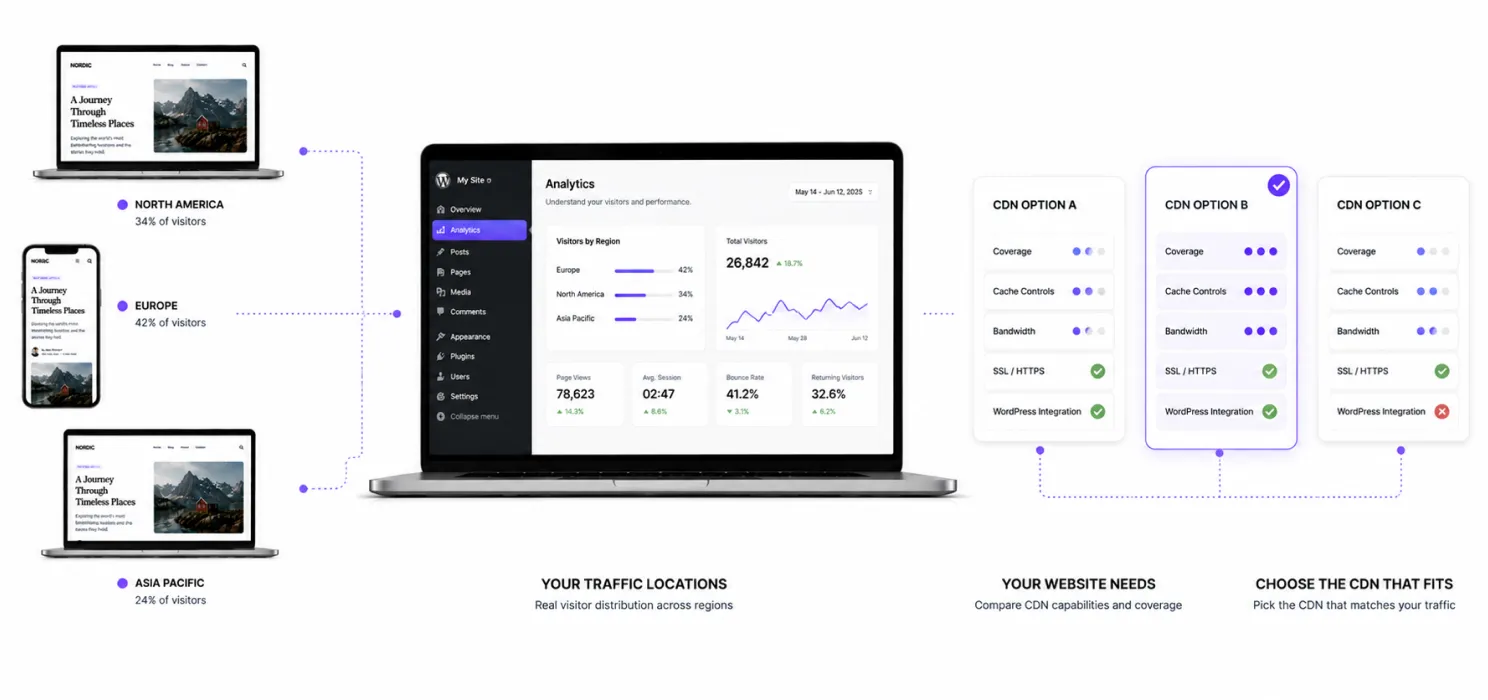
There are many CDN providers. Some are standalone CDN services. Some are integrated into hosting platforms. Some WordPress performance plugins include CDN connectivity.
When choosing one, consider:
- Geographic coverage
- Cache controls
- Bandwidth limits
- Pricing
- Purging options
- SSL support
- Image delivery
- Edge caching
- Security features
- WordPress integration
- Ease of configuration
Don’t choose a CDN simply because someone says it is “the fastest.” Your traffic locations and website architecture matter.
Step 2: Create your CDN account
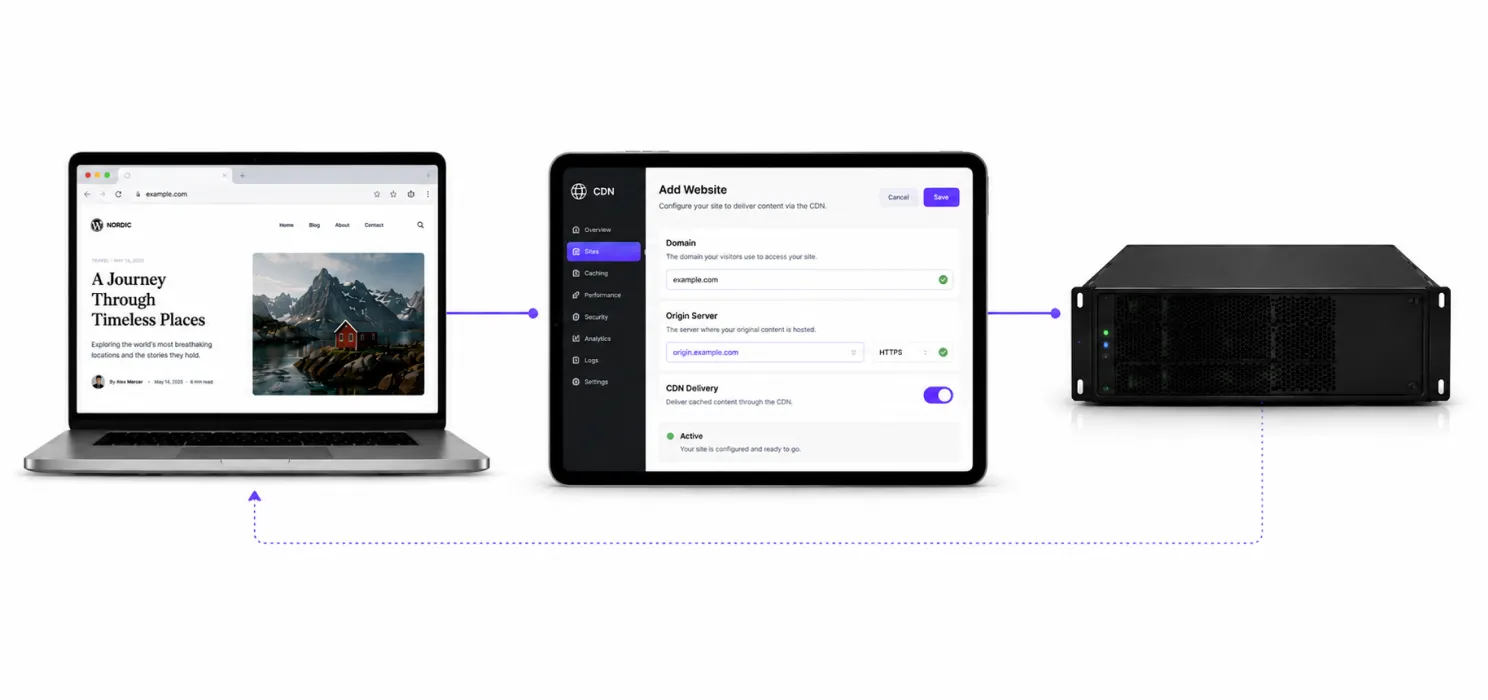
After choosing a provider, create an account and add your website.
Depending on the provider, you’ll usually need to provide your: Domain and configure the CDN to communicate with your origin server.
Some CDNs work through DNS. Others use a CDN URL or pull zone. The exact process varies by provider. But the underlying concept is similar:
Tell the CDN where your original content lives and what content it should deliver.
Step 3: Connect your WordPress website
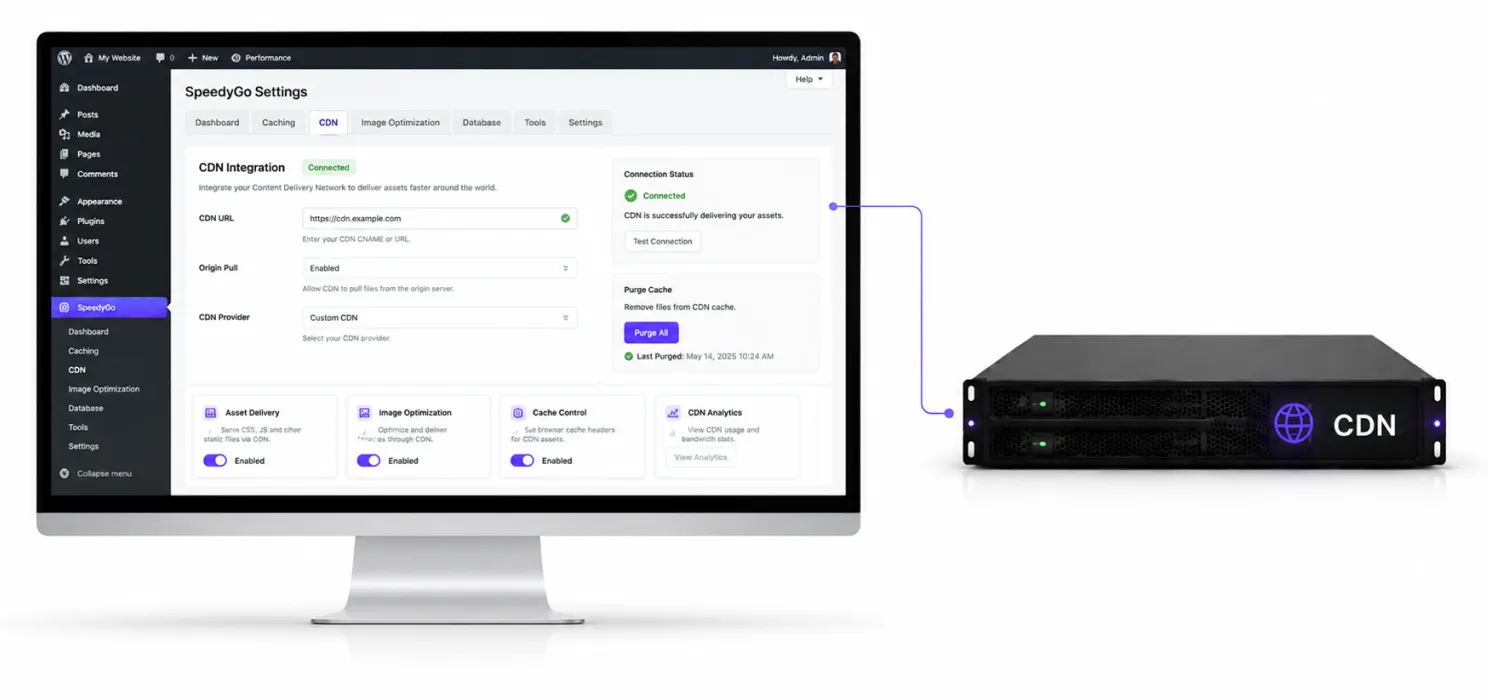
This is where WordPress plugins can make things easier. Many CDN providers offer WordPress integration.
The integration may help with:
- CDN URL rewriting
- Cache purging
- Asset delivery
- Image optimization
- Automatic configuration
- Cache management
If you’re using a WordPress performance plugin that supports CDN integration, you may be able to connect the CDN directly from the plugin’s settings. This is often easier than manually modifying your website.
Step 4: Configure your CDN URL or domain
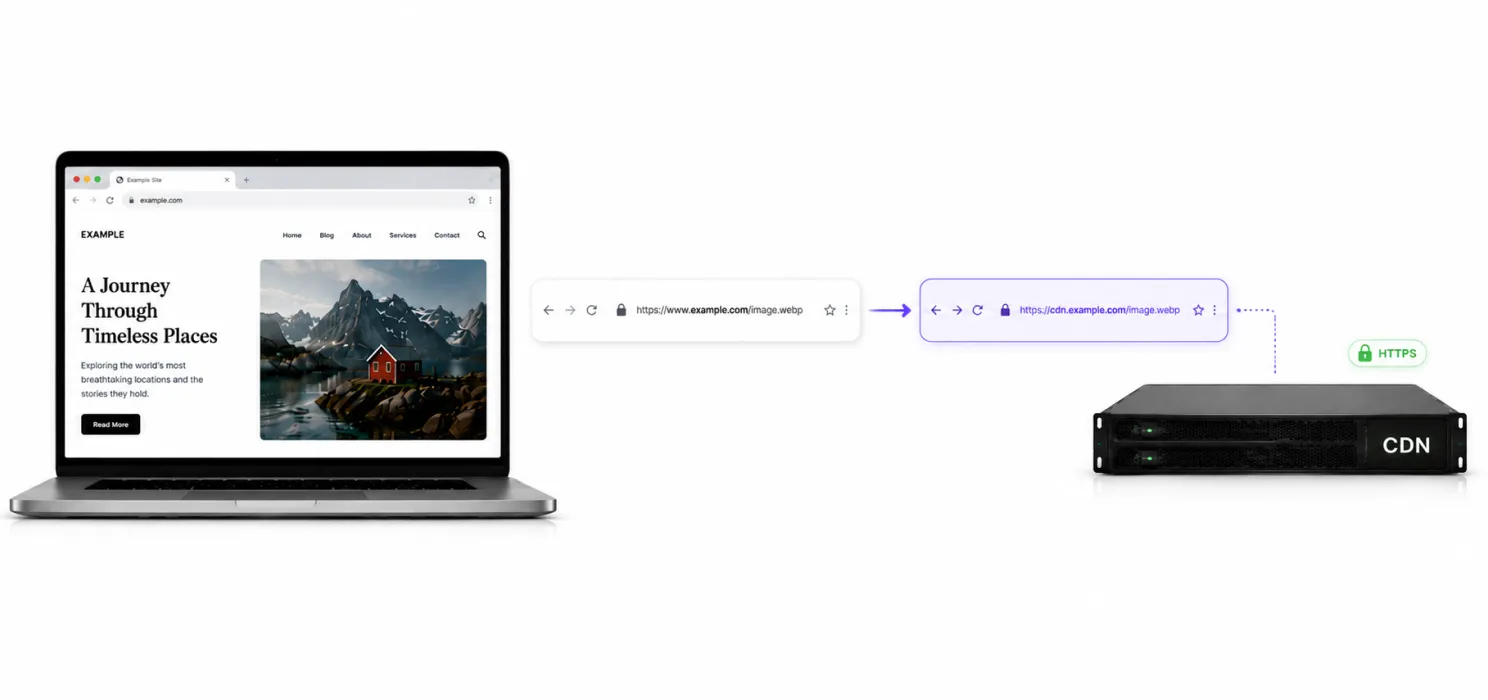
Some CDN setups use a separate hostname.
For example:
www.example.com
cdn.example.com
The second hostname can be used to deliver static resources.
Your website may then request: https://cdn.example.com/image.webp
instead of: https://www.example.com/image.webp
Other CDN systems can work directly with your main domain. The important thing is to make sure HTTPS is configured correctly.
Never sacrifice HTTPS just to get CDN delivery.
Step 5: Make sure SSL works correctly
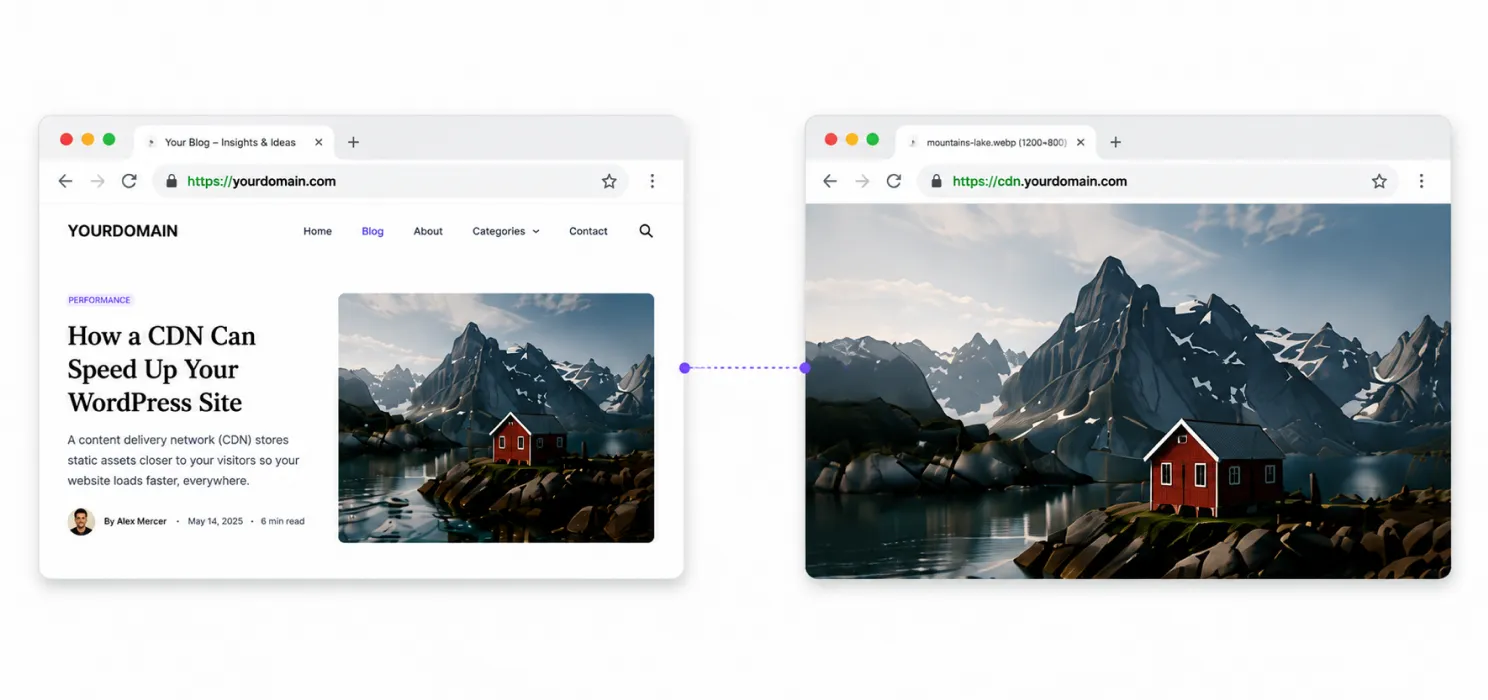
Your CDN should support HTTPS.
Check:
https://yourdomain.com
https://cdn.yourdomain.com
if your configuration uses a separate CDN hostname.
Also make sure you don’t create:
- Mixed-content warnings
- Redirect loops
- SSL errors
- Incorrect certificate configurations
A CDN should make the website faster. It shouldn’t turn your browser into a warning page.
Step 6: Configure caching rules
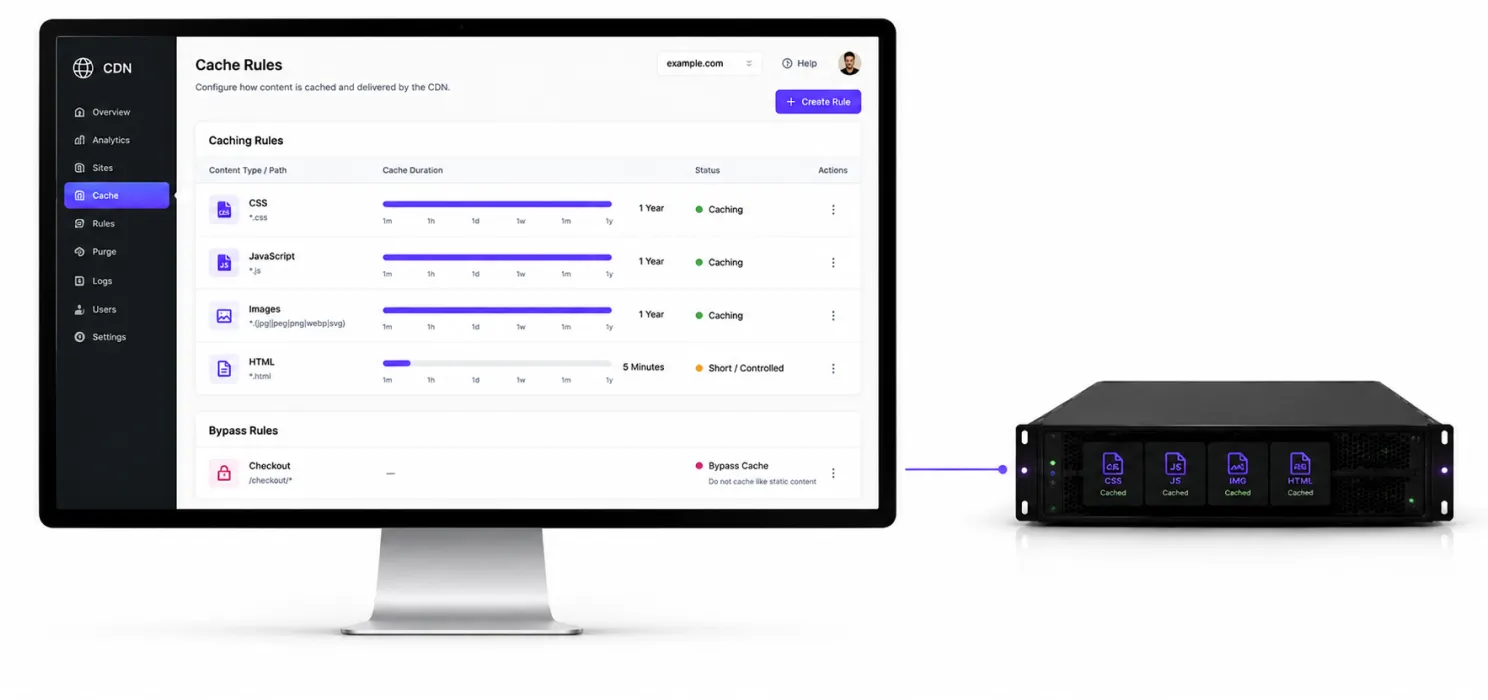
This is one of the most important steps. A CDN needs to know:
How long should this content stay cached?
For example:
- Static CSS: Could usually be cached for a long period.
- JavaScript: Could usually be cached for a long period if filenames change when files are updated.
- Images: Can often be cached for a long period.
- HTML: May need shorter or more carefully controlled caching.
- Checkout pages: Should generally not be treated like ordinary static pages.
Your caching rules should reflect how your website actually works.
Step 7: Understand cache expiration
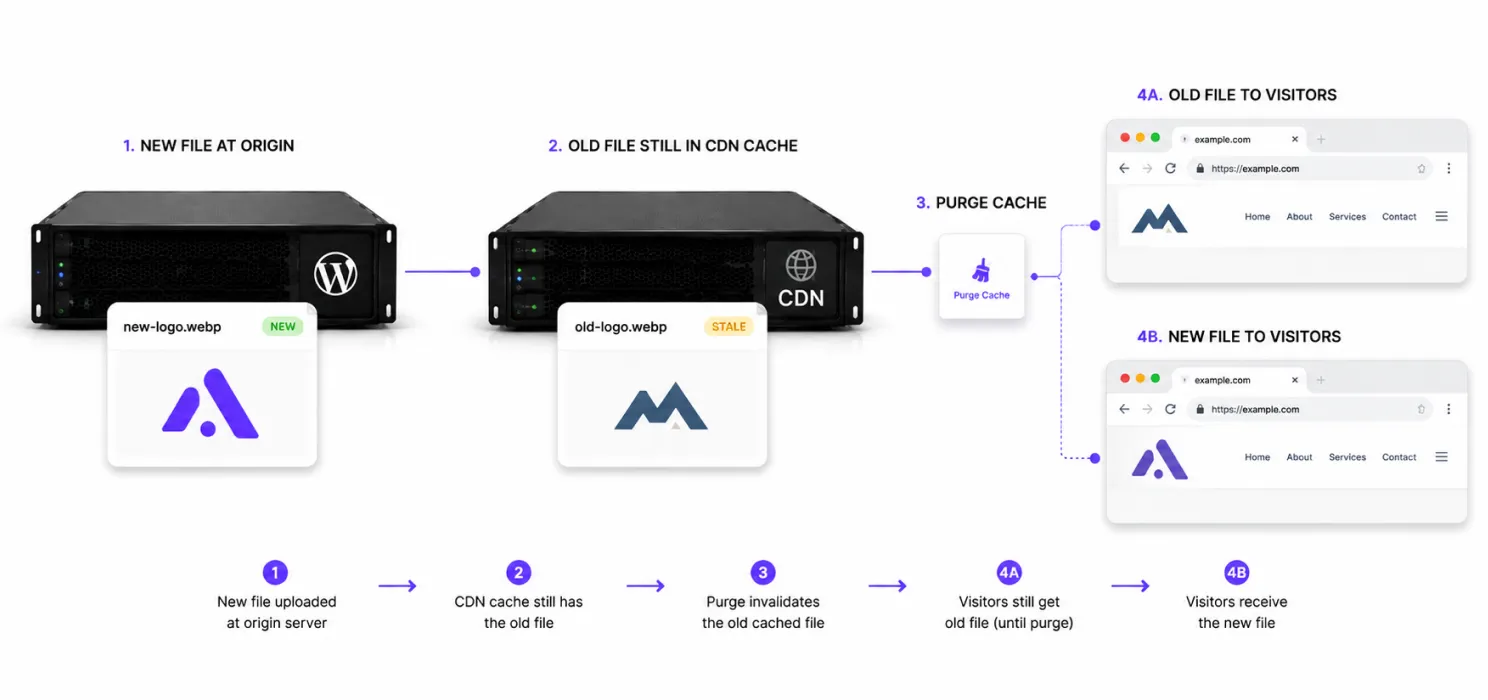
Imagine you update your logo.
Your WordPress website now has: new-logo.webp
But the CDN still has the old version cached. Visitors may continue seeing the old image. That’s why cache invalidation matters.
You may need to:
- Purge one file
- Purge a URL
- Purge a path
- Purge the entire cache
Step 8: Use cache-busting for assets
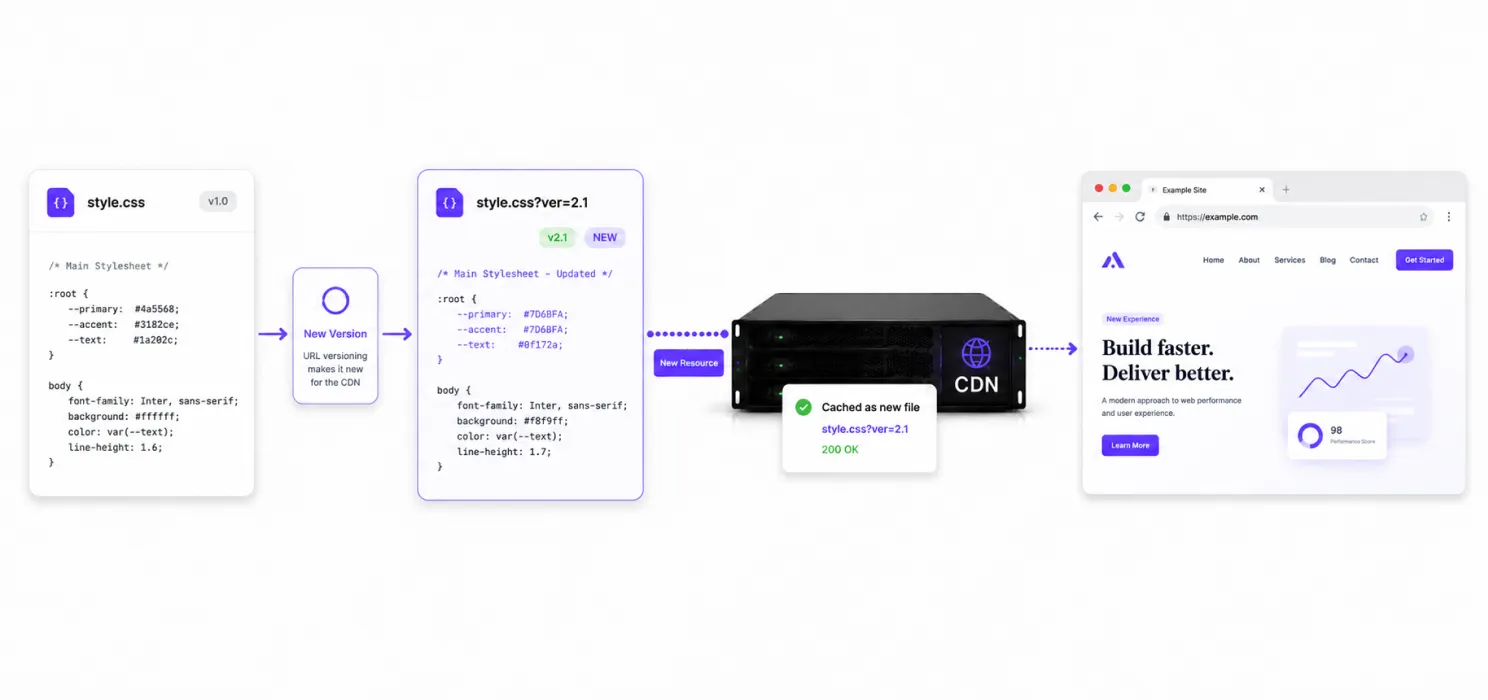
There’s another way to solve the “old file” problem.
Instead of changing: style.css
you can use versioned assets such as: style.css?ver=2.1
or hashed filenames such as: style-a82f31.css
When the filename changes, the CDN knows it is a new resource. This allows you to cache assets for longer without worrying as much about stale versions. WordPress already uses versioning for many assets, and good optimization systems can work with this approach.
Step 9: Don’t accidentally cache private pages
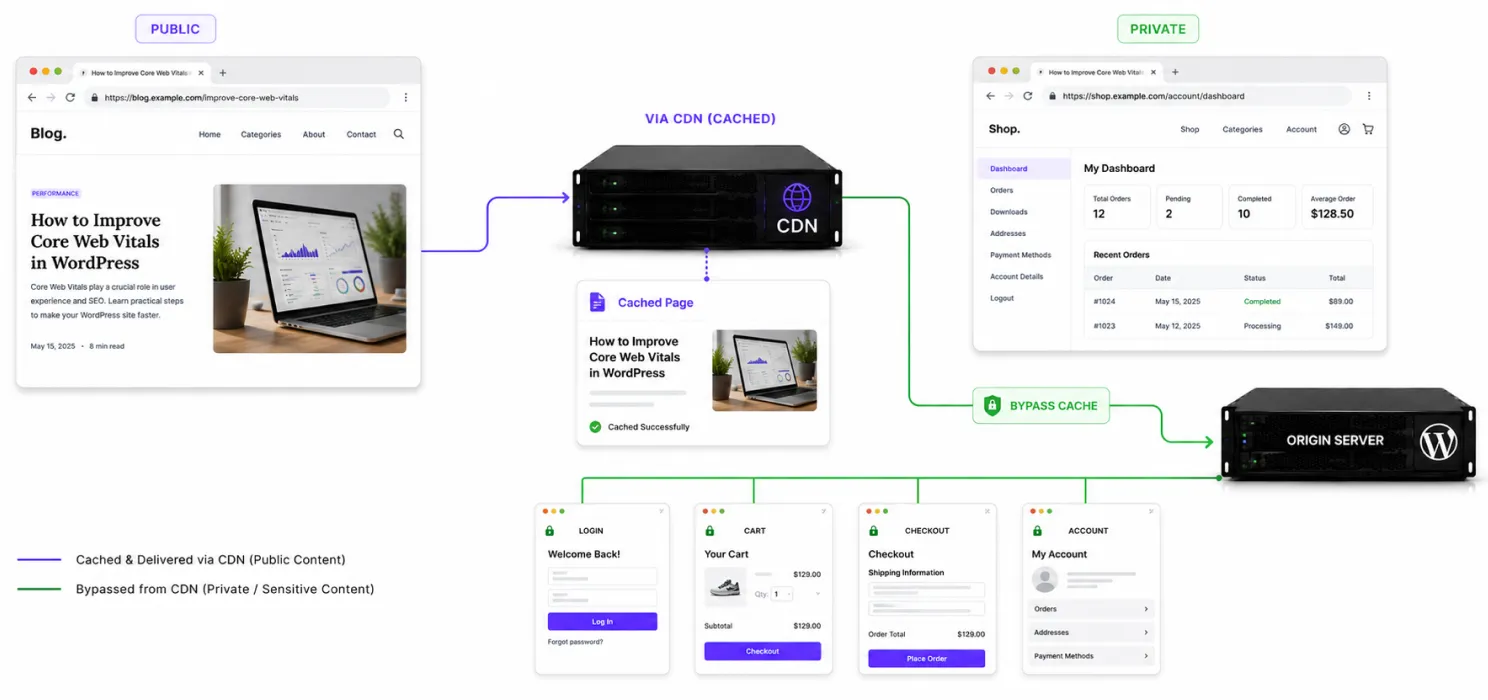
This is extremely important. Not every WordPress page should be cached publicly.
Be especially careful with:
- Login
- Account pages
- Cart
- Checkout
- Personalized dashboards
- Admin pages
- Membership content
Imagine one customer’s account page gets cached and another customer receives it. That’s not a performance problem. That’s a serious security problem. Your CDN caching rules must understand the difference between:
Public content
and
Private content.
For WooCommerce and membership websites, this deserves extra attention.
Step 10: Test your website after connecting the CDN
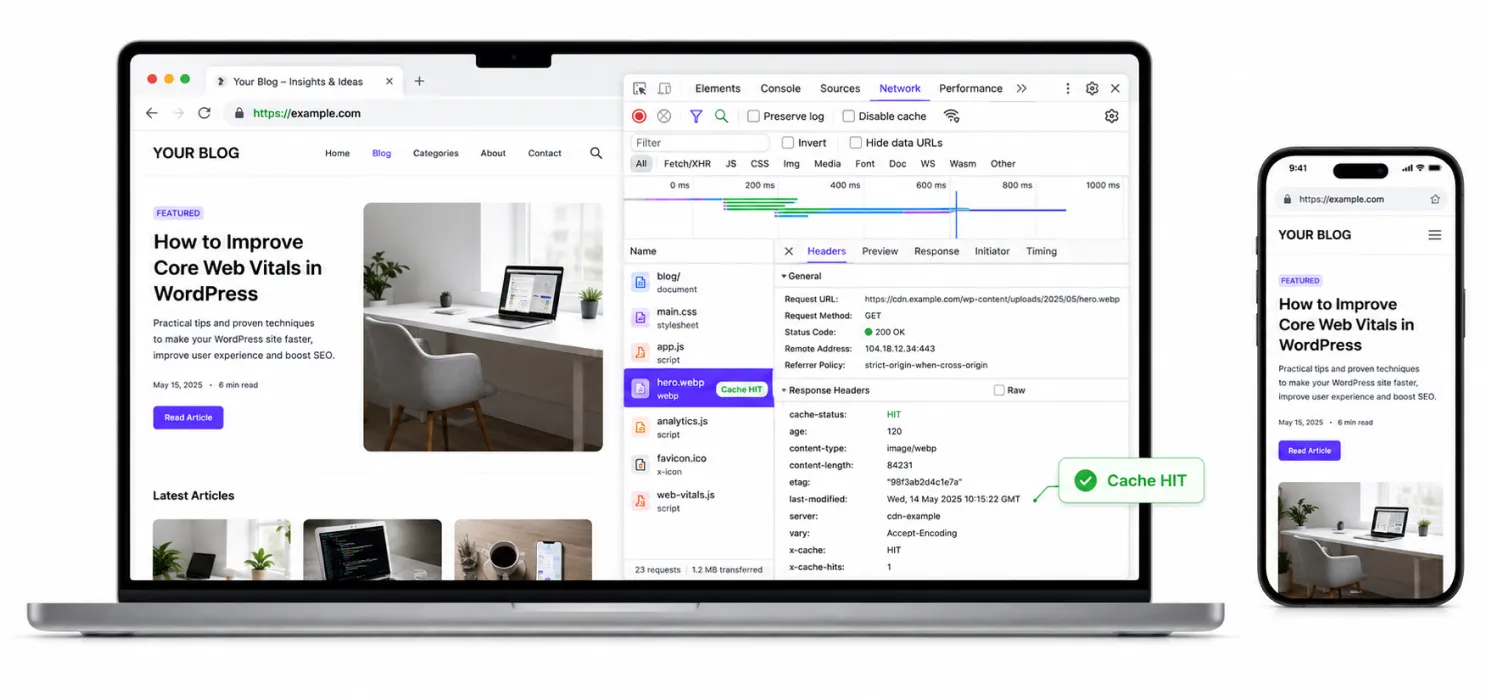
Don’t assume it works because the CDN dashboard says: Connected.
Open your website.
Test:
- Homepage
- Blog post
- Images
- CSS
- JavaScript
- Mobile layout
- Forms
- Login
- Cart
- Checkout
Then check your browser’s developer tools. Look at the response headers. You may see CDN-related headers showing whether the request was served from cache. The exact header names depend on the CDN.
How to check whether your CDN is actually working
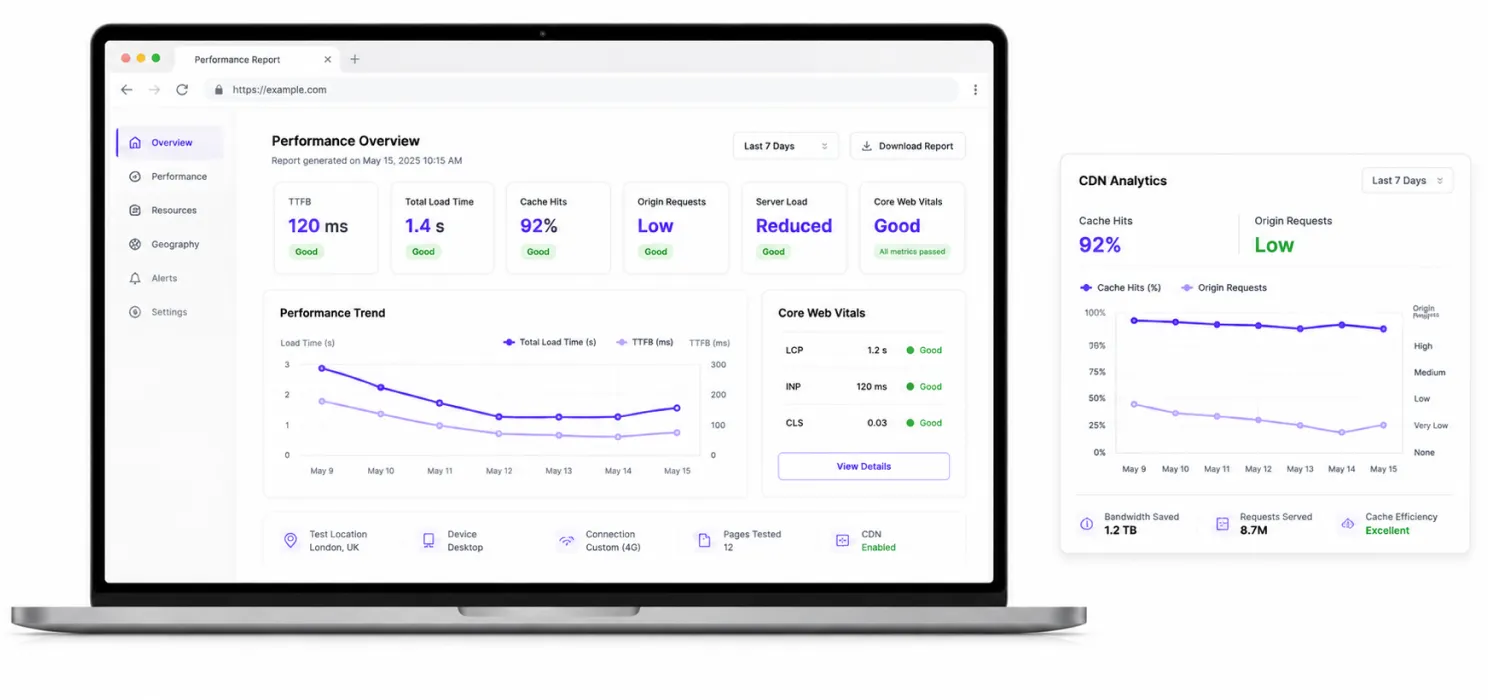
You want evidence. Not just a green “connected” message. Test your website from different locations if possible.
Look at:
- TTFB
- Total load time
- Asset delivery
- Cache hits
- Origin requests
- Server load
- Core Web Vitals
You can use tools such as:
- Google PageSpeed Insights
- Chrome DevTools
- WebPageTest
- CDN analytics
- Google Search Console
Google recommends PageSpeed Insights for understanding how pages perform for users and for identifying opportunities to improve page experience.
CDN alone won’t fix a slow WordPress website
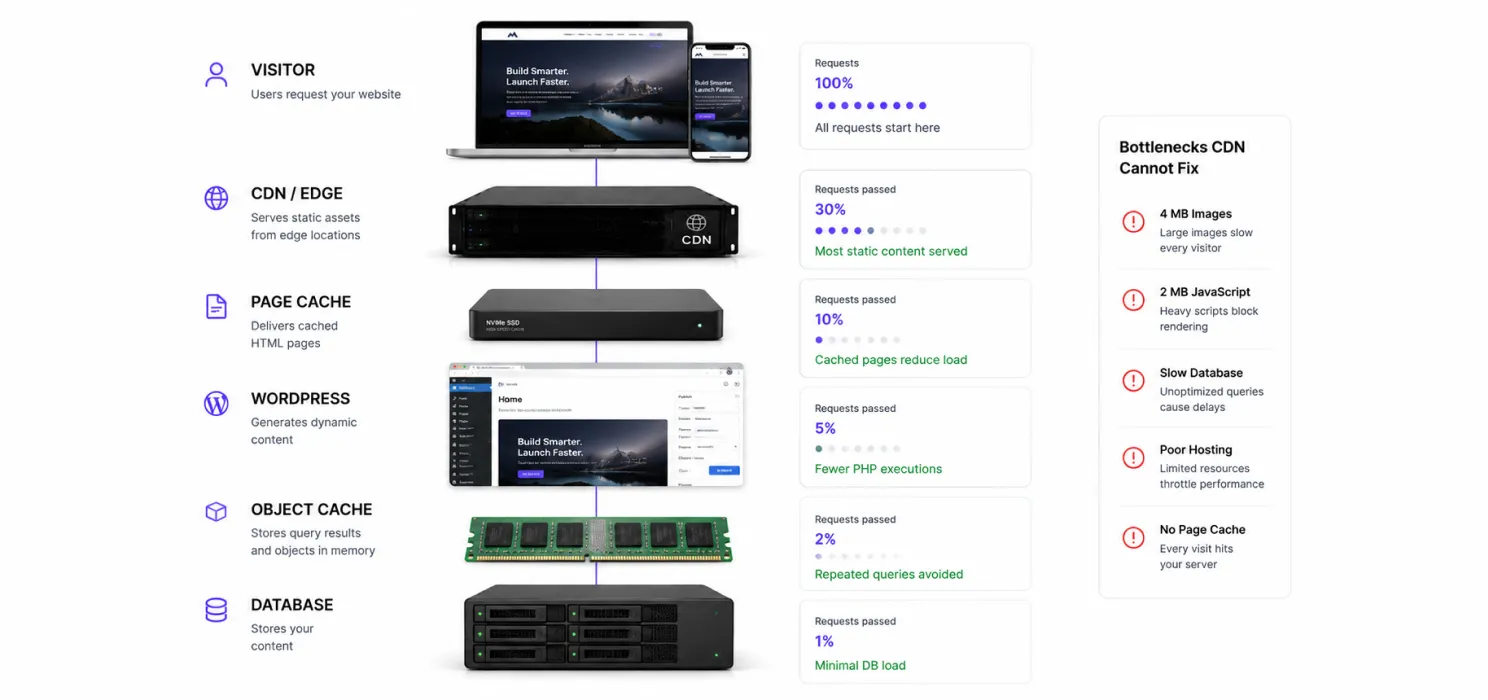
This is probably the most important warning in the article.
Imagine your website has:
4 MB of images
2 MB of JavaScript
slow database queries
poor hosting
no page caching
You add a CDN. Great.
Your static files may now arrive faster. But WordPress can still spend too much time generating the page. Your database can still be slow. Your JavaScript can still block interaction. Your images can still be unnecessarily large.
So think of the CDN as one layer of your performance strategy.
What about images?
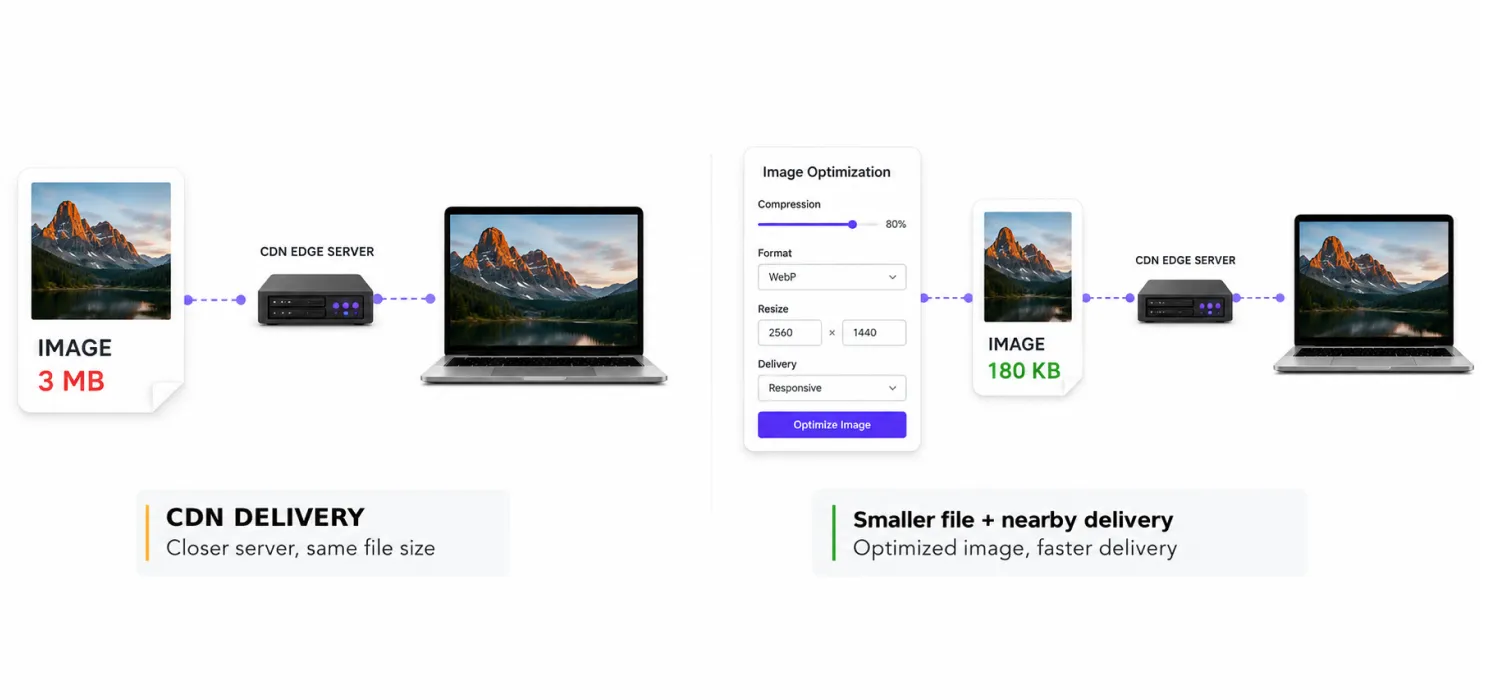
A CDN can deliver images. But delivery and optimization are different things. A CDN can move a 3 MB image closer to the visitor. But the visitor is still downloading 3 MB.
That’s why you should combine CDN delivery with:
- Compression
- WebP
- Appropriate dimensions
- Responsive images
- Lazy loading
- Image resizing
A smaller file delivered from a nearby server is generally better than a huge file delivered from a nearby server.
What about WordPress blogs?
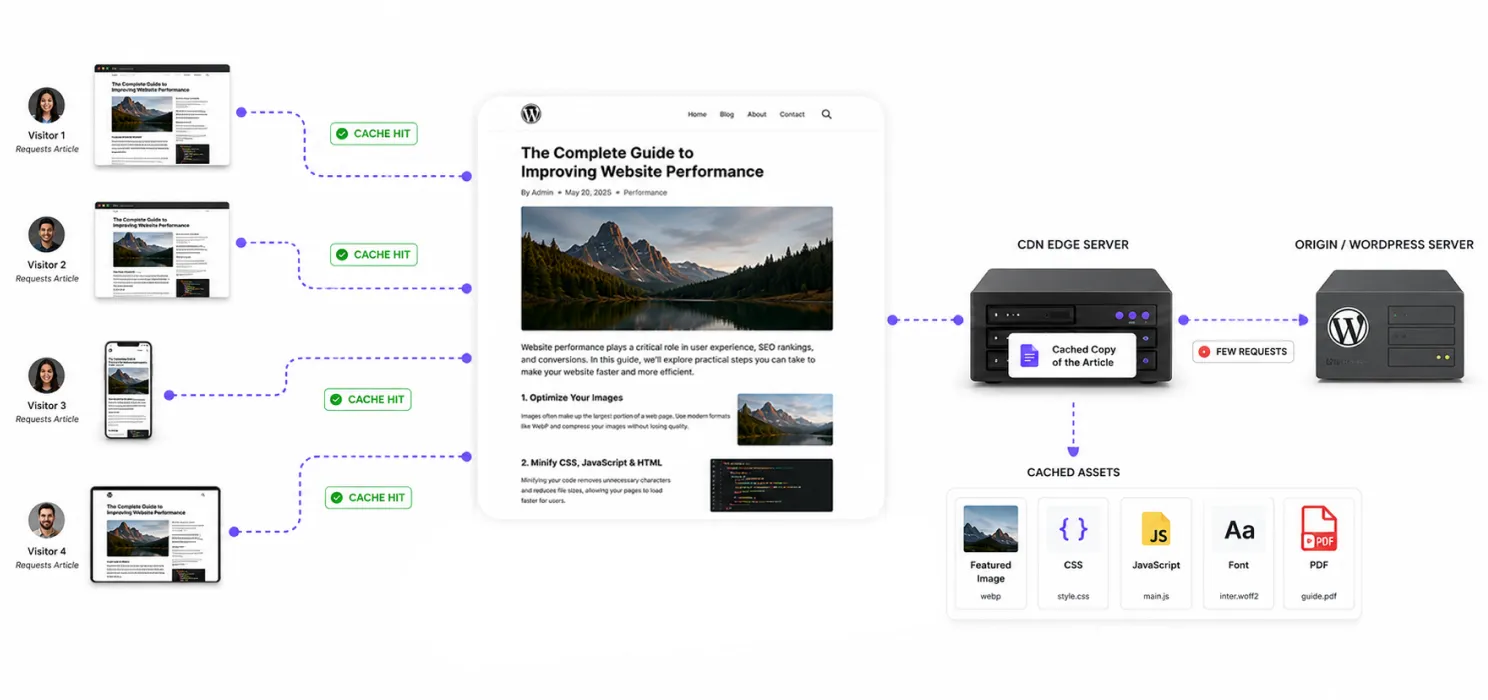
Blogs are usually excellent CDN candidates. Why?
Because much of the content is:
- Public
- Repeatedly accessed
- Relatively static
- Image-heavy
A popular article could be requested hundreds or thousands of times. If the CDN can serve the cached content, your origin server doesn’t need to process every request.
For blogs, consider putting these behind the CDN:
- Featured images
- In-content images
- CSS
- JavaScript
- Fonts
- PDFs
- Popular articles where full-page caching is appropriate
What about portfolios?
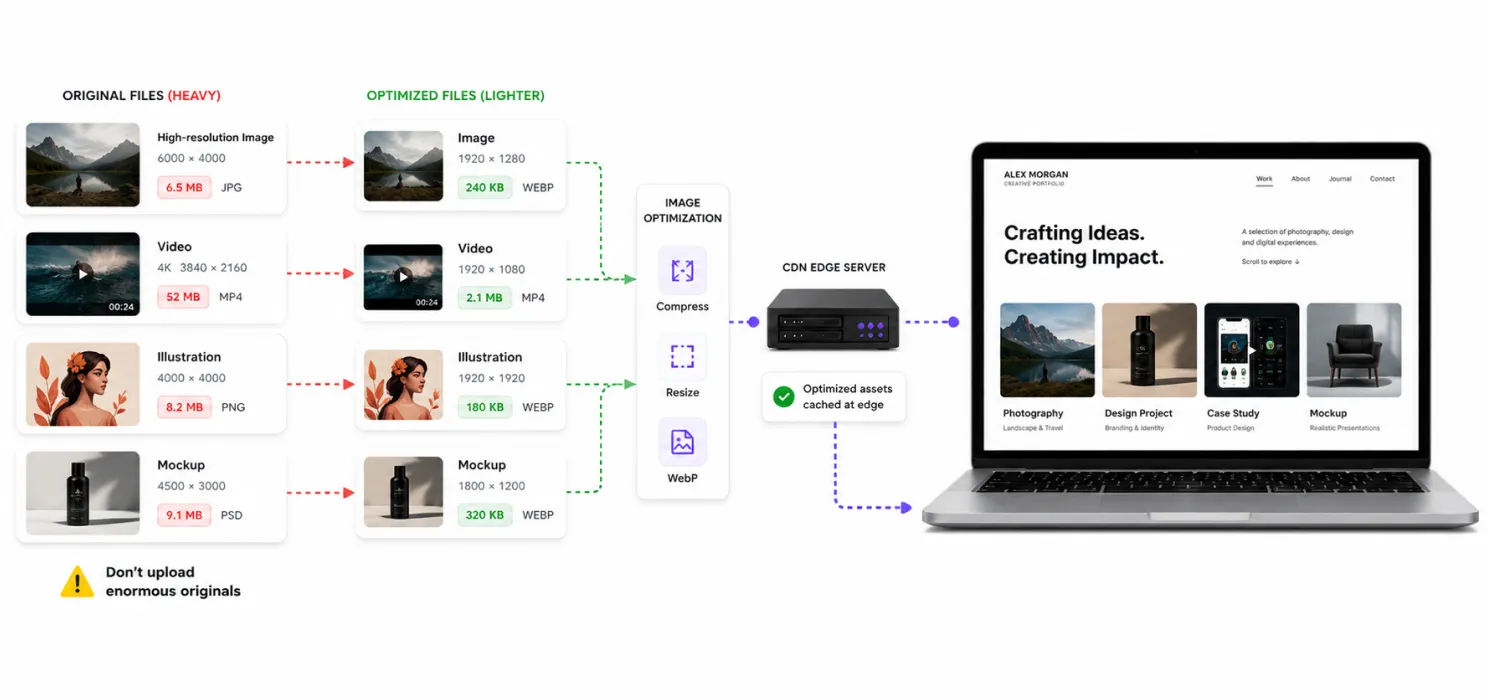
Portfolios can benefit even more from CDN delivery because they often contain large media files.
Think about:
- Photography
- Design projects
- Video
- Case studies
- Mockups
- Illustrations
- High-resolution galleries
A CDN can help deliver those assets from locations closer to visitors.
But again: Optimize the files before delivering them. Don’t use a CDN as an excuse to upload enormous original files.
What about WooCommerce?
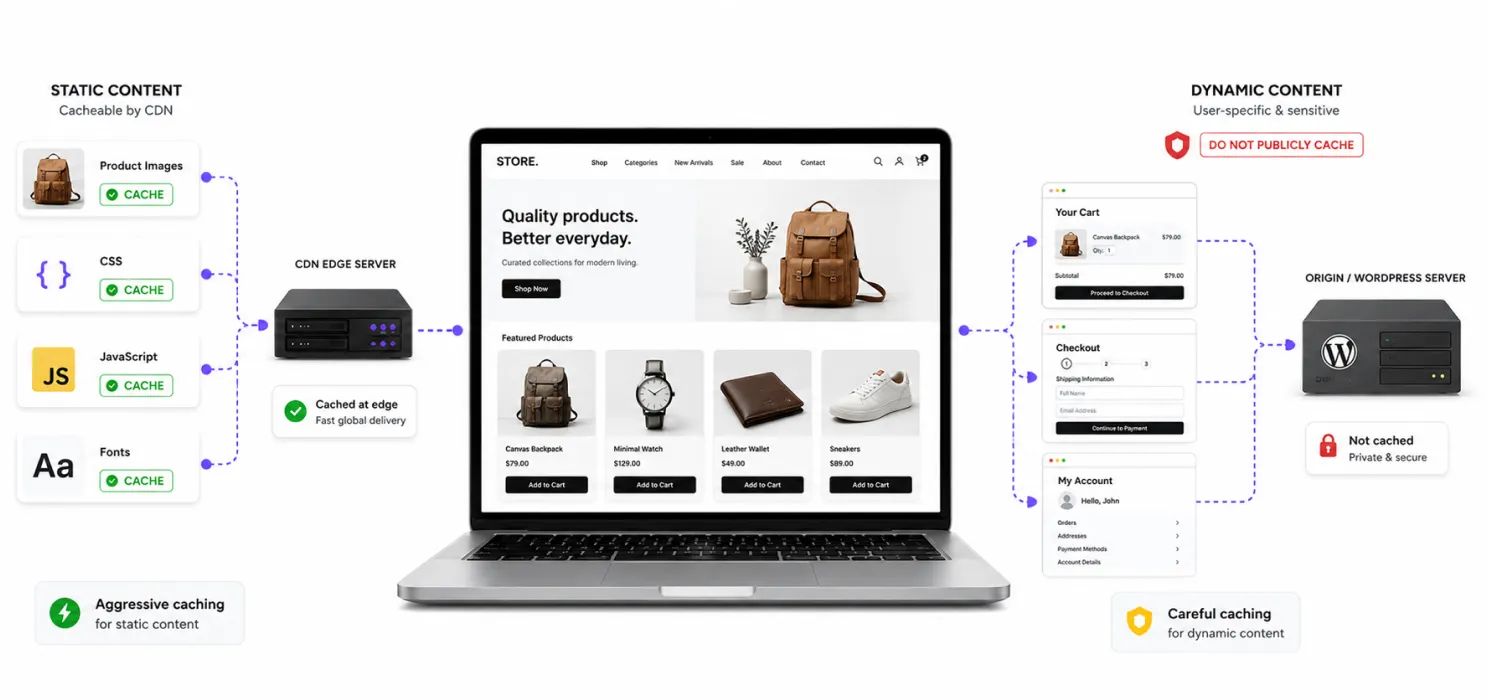
WooCommerce requires more careful CDN configuration. Static resources such as:
- Product images
- CSS
- JavaScript
- Fonts
can usually benefit from CDN delivery.
But dynamic areas such as:
- Cart
- Checkout
- Account
- Personalized content
need careful handling.
You don’t want to cache something that changes for every customer. A good WooCommerce setup therefore uses:
Aggressive caching for static content + carefully controlled caching for dynamic content.
Can you add a CDN without touching code?
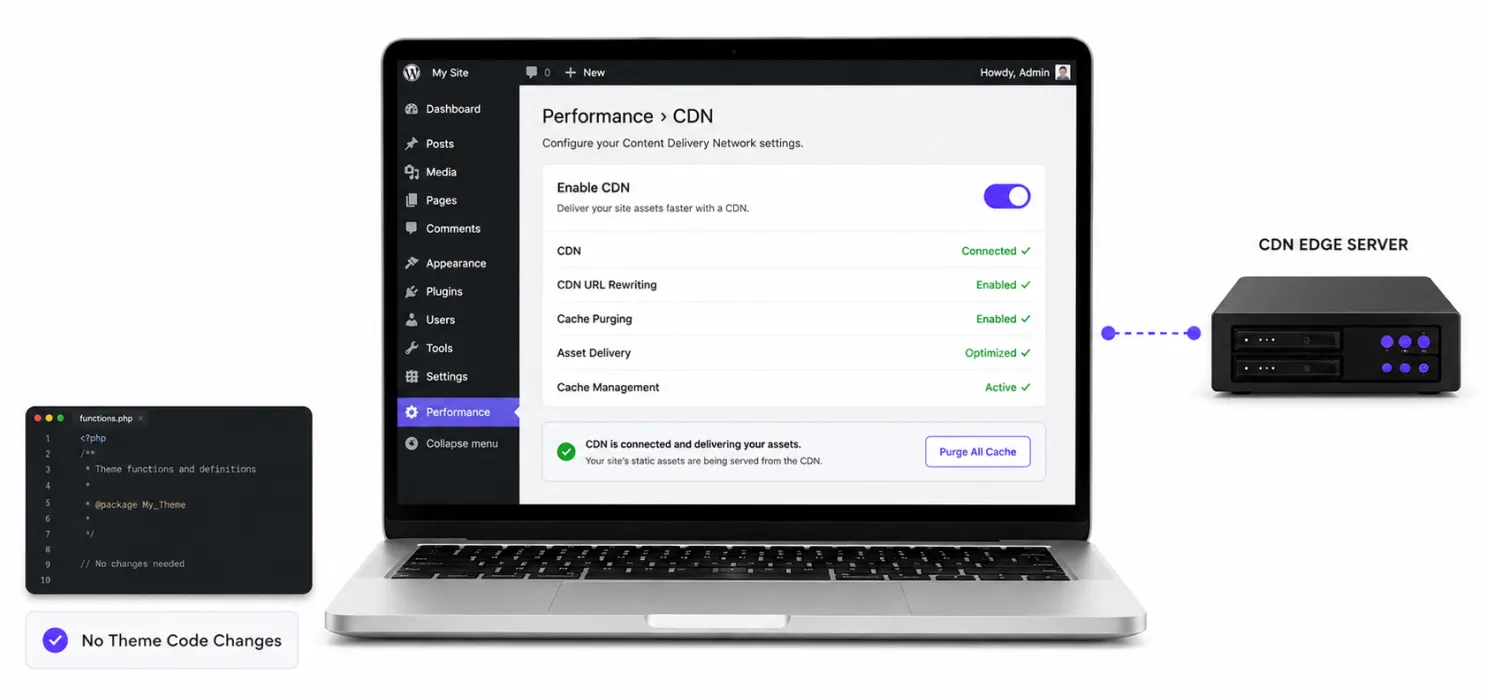
Yes. This is one reason CDN integration has become much easier for WordPress users.
Depending on the CDN, you may be able to connect it through:
- A WordPress plugin
- Your hosting dashboard
- DNS settings
- A CDN dashboard
For many website owners, a WordPress plugin is the simplest route because it can automatically handle things such as:
- CDN URL rewriting
- Cache purging
- Asset delivery
- Cache management
You don’t necessarily need to manually edit your theme files.
Using SpeedyGo to simplify CDN setup
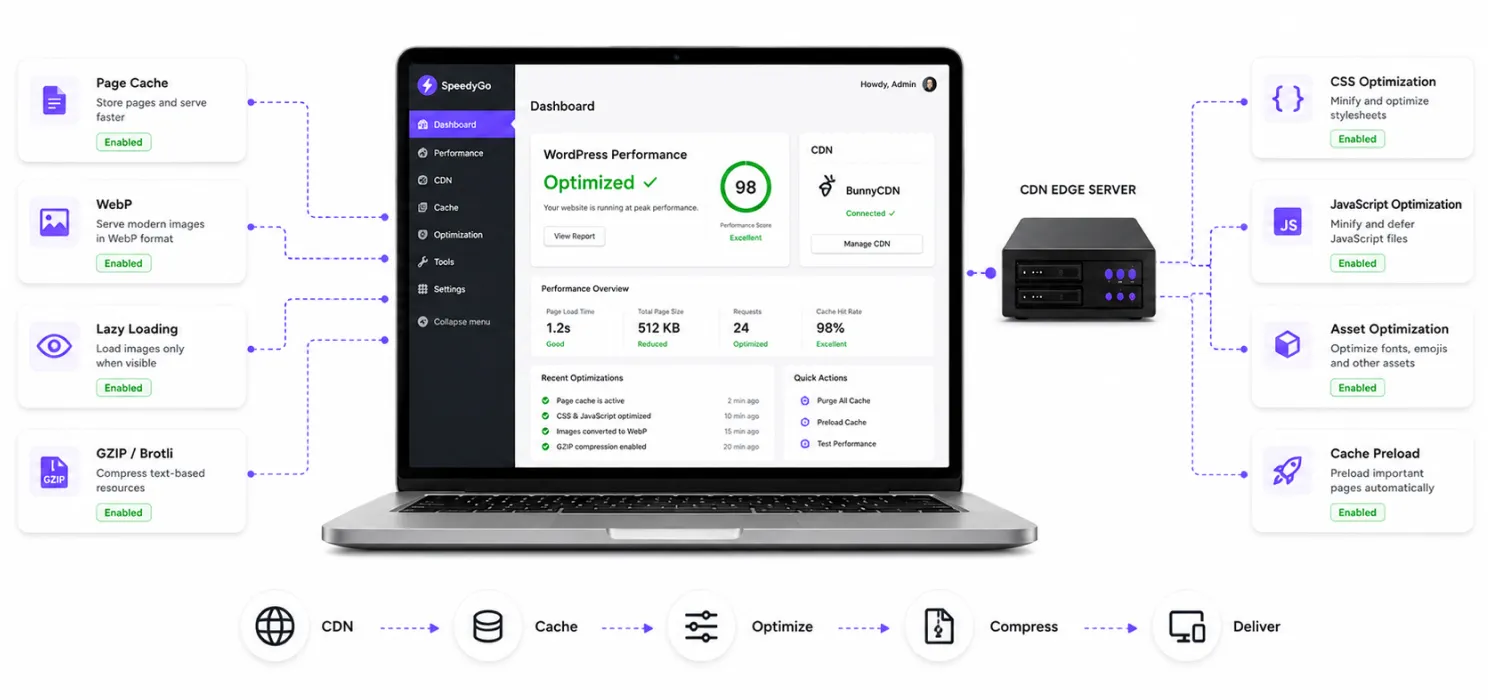
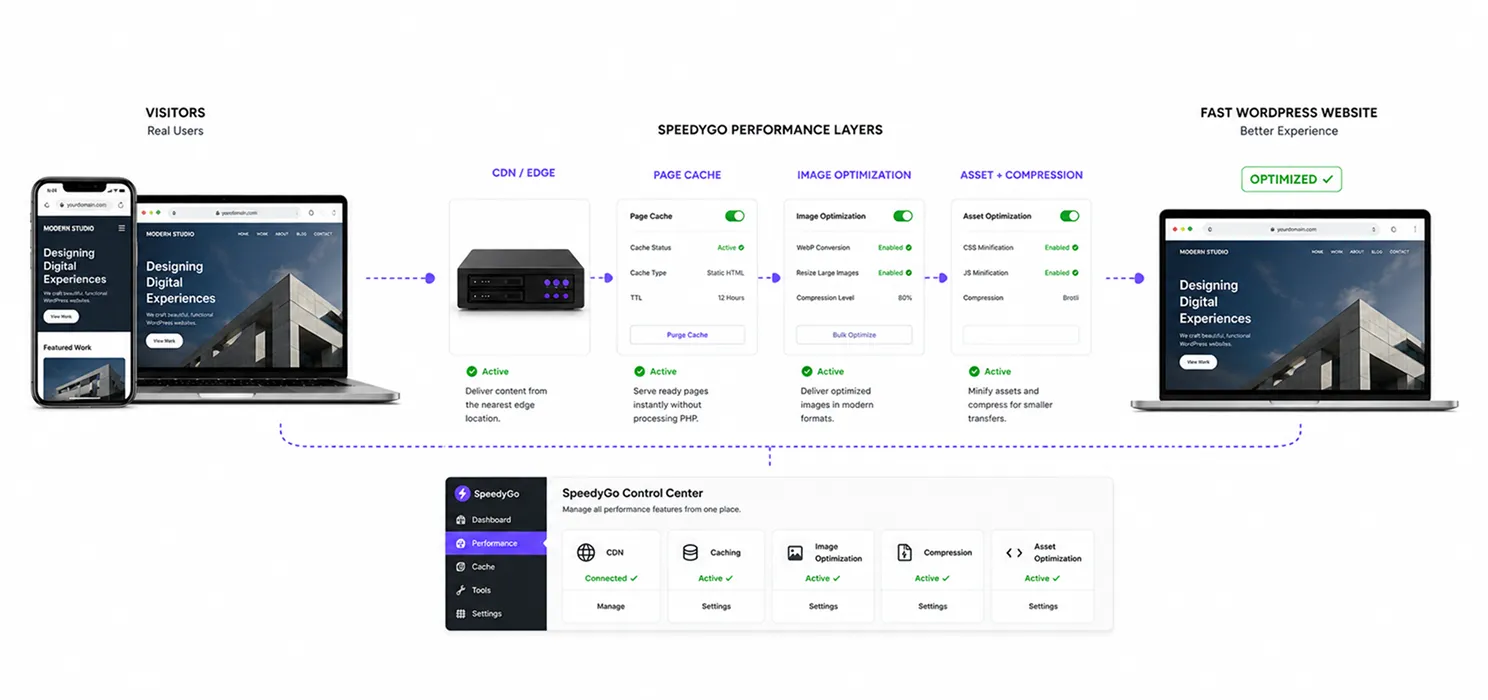
If you’re already using WordPress and don’t want to manage several separate performance tools, SpeedyGo is designed to bring several optimization functions together.
SpeedyGo includes a built-in CDN powered by BunnyCDN along with features such as:
- Page caching
- Mobile caching
- WebP conversion
- Lazy loading
- GZIP and Brotli compression
- CSS optimization
- JavaScript optimization
- Asset optimization
- Cache preload and warm-up
This means you can approach CDN delivery as part of a larger WordPress performance strategy rather than treating it as a completely separate system. And that’s important. Because a CDN is most useful when the rest of your website is also configured properly. A CDN can deliver your assets faster. Caching can reduce repeated WordPress processing. Image optimization can reduce file sizes. Compression can reduce transfer size. Asset optimization can reduce unnecessary browser work.
Together, those layers can create a much bigger improvement than any one setting on its own.
Final thoughts
Adding a CDN to WordPress isn’t difficult. The important part is using and configuring it properly. If your visitors are spread across locations, your site has lots of static content, or your server handles heavy traffic, a CDN can make a real difference.
But don’t just say, “I added a CDN.”
Also optimize images, cache pages, reduce unnecessary scripts, keep private pages out of public caches, and monitor the results. The goal isn’t to have a CDN. The goal is to make your website feel faster to real visitors.
SpeedyGo combines CDN delivery with caching, image optimization, compression, and asset optimization in one WordPress-focused solution.
Less distance. Less unnecessary work. Faster delivery.

Frequently Asked Questions
What is a CDN in WordPress?
A CDN (Content Delivery Network) is a network of servers located in different geographic locations that delivers website content from a server closer to the visitor. This can reduce latency and improve website loading speed.
Does every WordPress website need a CDN?
No. A CDN is especially useful for websites with visitors from different countries, high traffic, lots of images or large static files, and visitors who are far from the hosting server.
What files should I deliver through a CDN?
Common CDN candidates include images, CSS, JavaScript, web fonts, PDFs, videos, downloads, and other static media.
Does a CDN replace WordPress hosting?
No. Hosting runs WordPress, PHP, and the database, while a CDN primarily delivers cached content and static assets closer to visitors. The two work together rather than replacing each other.
Can a CDN cache WordPress HTML pages?
Yes, some CDN configurations can cache complete HTML pages. This can reduce repeated requests to WordPress, but dynamic pages require more careful caching rules.
How do I know if my CDN is actually working?
Test your website and check metrics such as TTFB, total load time, cache hits, origin requests, server load, and Core Web Vitals. Browser developer tools, PageSpeed Insights, WebPageTest, CDN analytics, and Google Search Console can also help.
Can I use a CDN with WooCommerce?
Yes, but WooCommerce requires careful configuration. Product images, CSS, JavaScript, and fonts can usually be delivered through a CDN, while cart, checkout, account, and personalized content need controlled caching.